Ahorra un 25 % (o incluso más) en tus costes de Kafka | Acepta el reto del ahorro con Kafka de Confluent
Deploying Confluent Operator on Red Hat OpenShift Container Platform on AWS
Confluent Operator allows you to deploy and manage Confluent Platform as a cloud-native, stateful container application on Kubernetes and OpenShift. The automation provided by Kubernetes, Operator, and Helm greatly simplifies provisioning and minimizes the burden of operating and managing Apache Kafka® clusters. Deploying Kafka into a Kubernetes cluster provides cloud portability, self-healing capabilities, single-click upgrades, and easy scale-up.
OpenShift Container Platform (OCP) is the flagship product from the OpenShift product series. It is an on-premises platform as a service built around Docker containers that are orchestrated and managed by Kubernetes on Red Hat Enterprise Linux. It can be deployed in all the public clouds as well. On prem, OCP gives the user flexibility and total control of all the components that it offers. OCP does come with lots of responsibilities, like securing control of the Kubernetes primary nodes, managing the etcd store, handling Kubernetes version updates, and more.
A single deployment of the Confluent Operator allows you to deploy multiple Kafka clusters. Confluent Platform can be deployed on OCP by deploying the Confluent Operator first and then deploying various components of Confluent Platform, either all at once or one by one. While deploying OCP can be challenging and frustrating, knowing the prerequisites and following the steps below make the deployment easy and fun.
At a high level, we will:
- Deploy OCP
- Deploy Confluent Operator in a project within OCP
- Deploy Confluent Platform on Confluent Operator
- Test that everything works
- Declare victory!
In order to deploy OCP successfully, you need to have an account with a cloud provider like AWS and with privileges to provision EC2 instances, modify Route 53 hosted zone settings, access and provision ebs volumes. Access to the OCP SDK, Red Hat network access credentials, and Confluent Operator install files is required as well. Equipped with all the required materials, you can deploy OCP and Confluent Operator. Let’s walk through the process in the rest of the blog post.
Prerequisites for deploying OCP on AWS
- Access to an AWS account
- Access to Red Hat network
- Familiarity with OCP SDK, also known as the oc command line utility and OpenShift installer.
- Download the latest version of Confluent Operator.
AWS cloud account
Whether your access to AWS is via a root login (not recommended) or via SSO, you must create a user. Then, use the AWS Access Key ID and AWS Secret Access Key with the aws configure command to get set up on your shell of choice. The AWS account needs to have appropriate roles to create virtual machines and access the Route 53 service. It’s also very important to use a functioning domain on Route 53. For the purposes of this blog post, we will be using rd-sky.net.
The typical output for the aws configure command resembles this:
$ aws configure
AWS Access Key ID [****************OOPS]:
AWS Secret Access Key [****************NOOP]:
Default region name [None]:
Default output format [json]:
Red Hat network account
A subscription to the Red Hat network is required to access OCP. You can get access by logging in to the Red Hat website.
OCP SDK and installer
Download and install the OCP SDK. The link provided is for MacOS.
Add the installed directory to the $PATH. On my shell, it looks like this: ~/tools/openshift-origin-client-tools-v3.11.0-0cbc58b-mac/oc
Once installed, the OpenShift installer and OpenShift command line utility (oc) are ready for use.
Confluent Operator 5.5
Download Confluent Operator and unzip the package. After unzipping the package confluent-operator-5.5.0.tar.gz in a directory, say, confluent-operator-5.5.0, its contents will look like the following:
$ cd confluent-operator-5.5.0; ls confluent-operator-5.5.0
COPYRIGHT               grafana-dashboard       resources
IMAGES                  helm                    scripts
Installing an OCP 4.3.3 cluster
Configure OCP
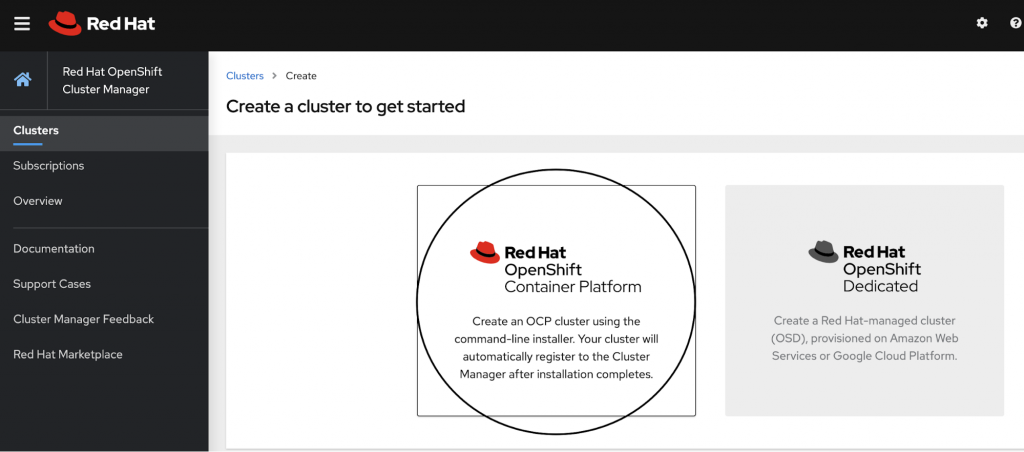
Installing an OCP 4.3.3 cluster is very easy and straightforward. We begin with logging in to Red Hat. After logging in, click on Clusters > Create Cluster.
Click on Red Hat OpenShift Container Platform, as highlighted in the screenshot below.
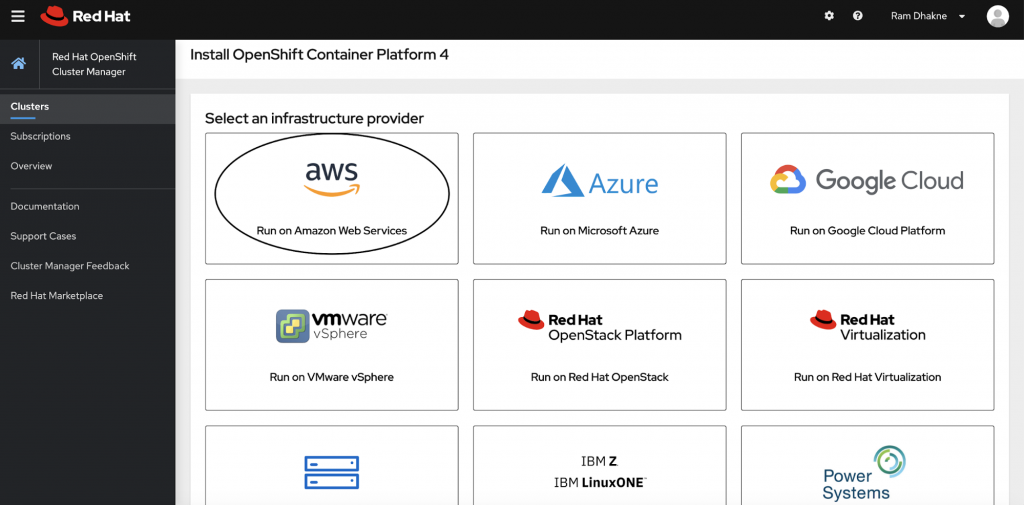
Pick the cloud of your choice to deploy OCP. For the purpose of this blog, I will be deploying on AWS.
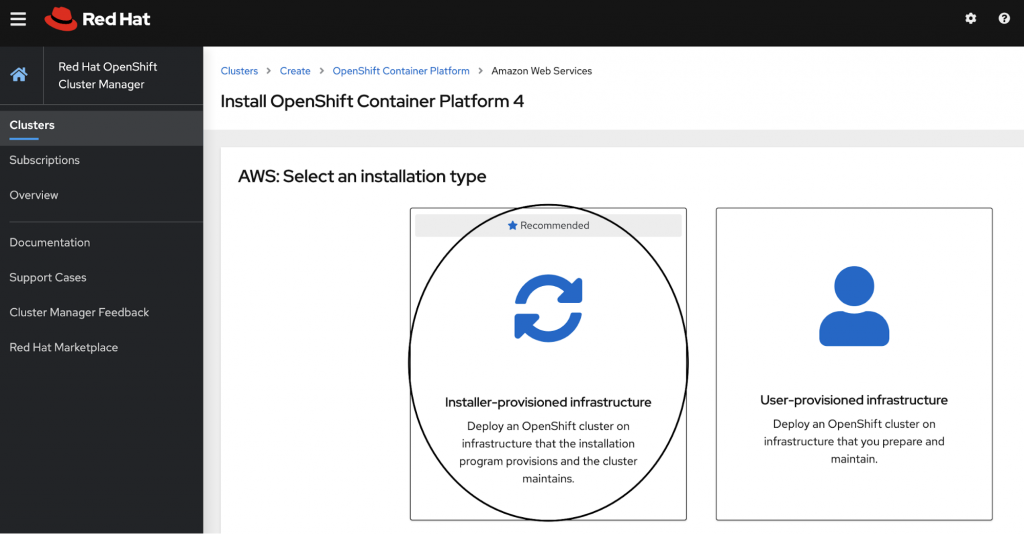
The recommended option for deploying OCP is the “Installer-provisioned infrastructure” option as highlighted in the screenshot below.
The next step is to copy the secret as shown in the screenshot below.
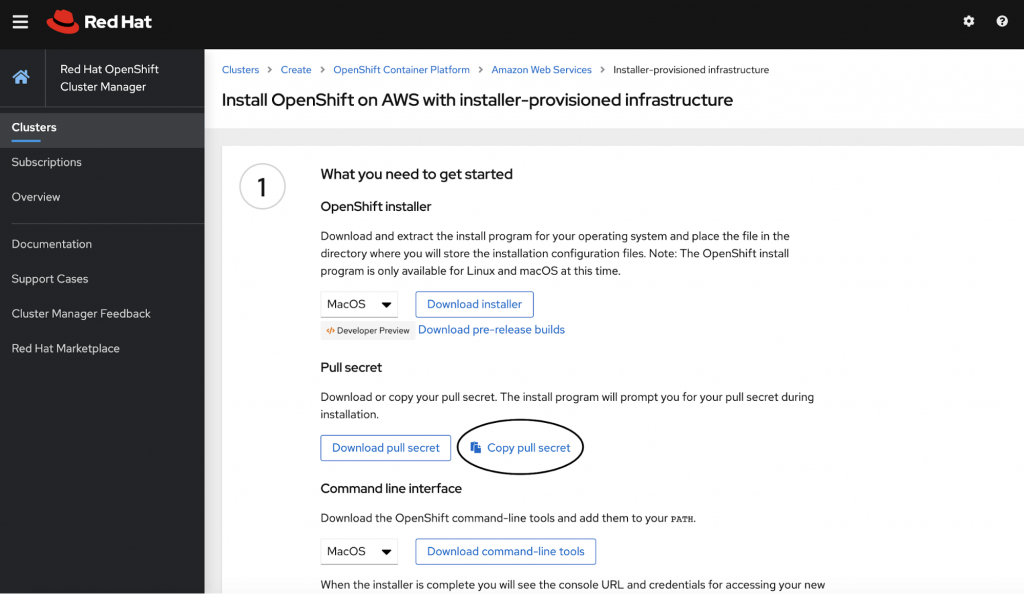
Now, it’s time to switch to the shell and fire the command to run the installer.
mkdir oc-aws-demo
openshift-install create install-config --dir=oc-aws-demo/
? Platform  [Use arrows to move, enter to select, type to filter, ? for more help]
> aws
  azure
  gcp
  openstack
  ovirt
Choose aws, and then press enter:
openshift-install create install-config --dir=oc-aws-demo/
? Platform aws
INFO Credentials loaded from the "default" profile in file "~/.aws/credentials"
? Region  [Use arrows to move, enter to select, type to filter, ? for more help]
  eu-west-3 (Paris)
  me-south-1 (Bahrain)
  sa-east-1 (São Paulo)
> us-east-1 (N. Virginia)
  us-east-2 (Ohio)
  us-west-1 (N. California)
  us-west-2 (Oregon)
Choose the region for deploying the OCP cluster. You will have the option to use a base domain. Select the one that was created for this purpose or use an existing one.
./openshift-install create install-config --dir=oc-aws-demo/
? Platform aws
INFO Credentials loaded from the "default" profile in file "~/.aws/credentials"
? Region us-east-1
? Base Domain  [Use arrows to move, enter to select, type to filter, ? for more help]
> rd-sky.net
  jamesbond.uk
  james007.net
  goldfinger.org
Give a name to the OCP cluster, for example, ocp-us-east-1-k8s-demo-cluster:
openshift-install create install-config --dir=oc-aws-demo/
? Platform aws
INFO Credentials loaded from the "default" profile in file "~/.aws/credentials"
? Region us-east-1
? Base Domain rd-sky.net
? Cluster Name [? for help] ocp-us-east-1-k8s-demo-cluster
Provide the pull secret to finish the “create config” stage:
openshift-install create install-config --dir=oc-aws-demo/
? Platform aws
INFO Credentials loaded from the "default" profile in file "~/.aws/credentials"
? Region us-east-1
? Base Domain rd-sky.net
? Cluster Name ocp-us-east-1-k8s-demo-cluster
? Pull Secret [? for help] ***************************************************************************************************************************************************************************************************************************************************************************************************************************************************************************************************************************************************************************************************************************
$
Once this step is complete, you should see a file named install-config.yaml in the directory, which was passed as an argument to the installer command:
ls oc-aws-demo/
install-config.yaml
Once you have an install-config.yaml file, it can be adjusted to suit your deployment scenario, whether you are deploying it for pre-production workloads or for production workloads. It can also be adjusted based on how many resources you want to deploy.
For the purposes of this demo deployment, I have selected low CPU and low-memory AWS instances:
compute:
- architecture: amd64
  hyperthreading: Enabled
  name: worker
  platform:
    aws:
      types: m5.xlarge
  replicas: 3
More details about tuning install-config.yaml parameters can be found in the documentation.
Deploy the OCP cluster
Now, you are ready to deploy the OCP cluster:
$ openshift-install create cluster --dir=oc-aws-demo/
INFO Credentials loaded from the "default" profile in file "~/.aws/credentials"
INFO Consuming Install Config from target directory
INFO Creating infrastructure resources...
This can be a great time to make a fine cup of coffee, enjoy a break in the backyard, or get started on a new book. After about 30–35 minutes, if all goes well, you should see these messages in the logs:
INFO Install complete!
INFO To access the cluster as the system:admin user when using 'oc', run 'export KUBECONFIG=~/Documents/work/k8s/oc/oc-aws-demo/auth/kubeconfig'
INFO Access the OpenShift web-console here: https://console-openshift-console.apps.ocp-us-east-1-k8s-demo-cluster.rd-sky.net
INFO Login to the console with user: kubeadmin, password: XXXXXXXxxxxXXXXxxxx
The OCP cluster has been deployed successfully! Let’s access it and merge the remote Kubernetes cluster context locally:
export KUBECONFIG=~/Documents/work/k8s/oc/oc-aws-demo/auth/kubeconfig
oc get nodes
NAME                           STATUS    ROLES     AGE       VERSION
ip-10-0-135-239.ec2.internal   Ready     master    24h       v1.17.1
ip-10-0-140-27.ec2.internal    Ready      worker     23h       v1.17.1
ip-10-0-144-235.ec2.internal   Ready     worker    23h       v1.17.1
ip-10-0-151-53.ec2.internal    Ready      master    24h       v1.17.1
ip-10-0-166-231.ec2.internal   Ready     worker    23h       v1.17.1
ip-10-0-168-131.ec2.internal   Ready     master    24h       v1.17.1
Yay! The hard part is done. Now let’s do the easy part by deploying the Confluent Operator.
Choosing persistent storage for Kafka
Using best practices seen in production deployments can help simplify the process of choosing right persistent volumes.
Kubernetes cluster on premises
If the Kubernetes cluster (e.g., OCP) is deployed on prem, then your choice might be limited to what is already available for persistent storage in your Kubernetes clusters. There are lots of vendors that support Kubernetes persistent storage layers. For on-prem users, we recommend vSphere, Portworx, ScaleIO, or StorageOS volumes. More details can be found in the documentation.
Kubernetes cluster in the public cloud
Kubernetes clusters in the cloud ranging from managed Kubernetes services like Azure Kubernetes Service (AKS), Google Kubernetes Engine, and EKS (AWS) have their respective persistence storage provisioners. They are well integrated with the managed Kubernetes offering. It is strongly recommended to use the native persistent volume provisioner from the cloud vendor. With my OCP Kubernetes cluster on AWS, I have aws-ebs as the StorageClass provisioner for the cluster.
Deploying Confluent Operator
First, create a project and have all assets related to the Confluent Operator deployed in that project.
Create a new project named operator
oc new-project operator
Now using project "operator" on server
"https://api.ocp-us-east-1-k8s-demo-cluster.rd-sky.net:6443".
Deploy Confluent Operator
Helm version used
helm version
version.BuildInfo{Version:"v3.0.3", GitCommit:"ac925eb7279f4a6955df663a0128044a8a6b7593", GitTreeState:"clean", GoVersion:"go1.13.7"}
Pwd
~/Documents/work/k8s/oc/550/helm
ls
README.rst  scripts  confluent-operator  providers
Make a copy of providers/aws.yaml into, say, values.yaml, which will be used to update parameters relevant to your operator deployment:
helm install operator ./confluent-operator -f values.yaml --namespace operator --set operator.enabled=true
A sample values.yaml used in the current blog post can be found here GitHub
Deploy ZooKeeper nodes
Set the security context by using a custom UID file. This is a cluster-wide setting and needs to be run once.
oc create -f scripts/openshift/customUID/scc.yaml
Create ZooKeeper ensemble:
helm install zookeeper ./confluent-operator -f values.yaml --namespace operator --set zookeeper.enabled=true
Verify that the appropriate pod security context has been set:
oc exec -ti zookeeper-0 bash
1002580000@zookeeper-0:/opt$ id
uid=1002580000(1002580000) gid=0(root) groups=0(root),1002580000
Deploy Kafka brokers
helm install kafka-oc-demo ./confluent-operator -f values.yaml --namespace operator --set kafka.enabled=true
Deploy Confluent Schema Registry
helm install schemaregistry ./confluent-operator -f values.yaml --namespace operator --set schemaregistry.enabled=true
Deploy Confluent Control Center
helm install -f values.yaml controlcenter --namespace operator --set controlcenter.enabled=true ./confluent-operator
Deploy the Kafka Connect framework
helm install -f values.yaml connectors --namespace operator --set connect.enabled=true ./confluent-operator
Complete the picture
When all is said and done, you should see these many components deployed:
oc get pods
NAME                                   READY     STATUS    RESTARTS   AGE
cc-operator-fcb87457-7d6pn             1/1       Running   0          2d20h
connectors-0                           1/1       Running   0          19m
controlcenter-0                        1/1       Running   0          25h
kafka-oc-demo-0                        1/1       Running   0          2d8h
kafka-oc-demo-1                        1/1       Running   0          2d8h
kafka-oc-demo-2                        1/1       Running   0          2d7h
schemaregistry-0                       1/1       Running   0          25h
schemaregistry-1                       1/1       Running   0          25h
zookeeper-0                            1/1       Running   0          2d19h
zookeeper-1                            1/1       Running   0          2d19h
zookeeper-2                            1/1       Running   0          2d19h
Networking
Control Center can be accessed by exposing the internal service via a load balancer in OCP, such as this:
oc get svc | grep control
controlcenter.               ClusterIP.     None             <none>
9021/TCP,7203/TCP,7777/TCP                     66m
controlcenter-0-internal     ClusterIP      172.30.213.238   <none>                                                                    9021/TCP,7203/TCP,7777/TCP                     66m
controlcenter-bootstrap-lb   LoadBalancer   172.30.250.158   ab7ece27b585c4f238616abd5e2c857c-1775407194.us-east-1.elb.amazonaws.com   80:32275/TCP
Once the service is exposed, it can be accessed by hitting Elastic Load Balancing (ELB):
ab7ece27b585c4f238616abd5e2c857c-1775407194.us-east-1.elb.amazonaws.com
The default username and password for the Control Center login is: admin/Developer1.
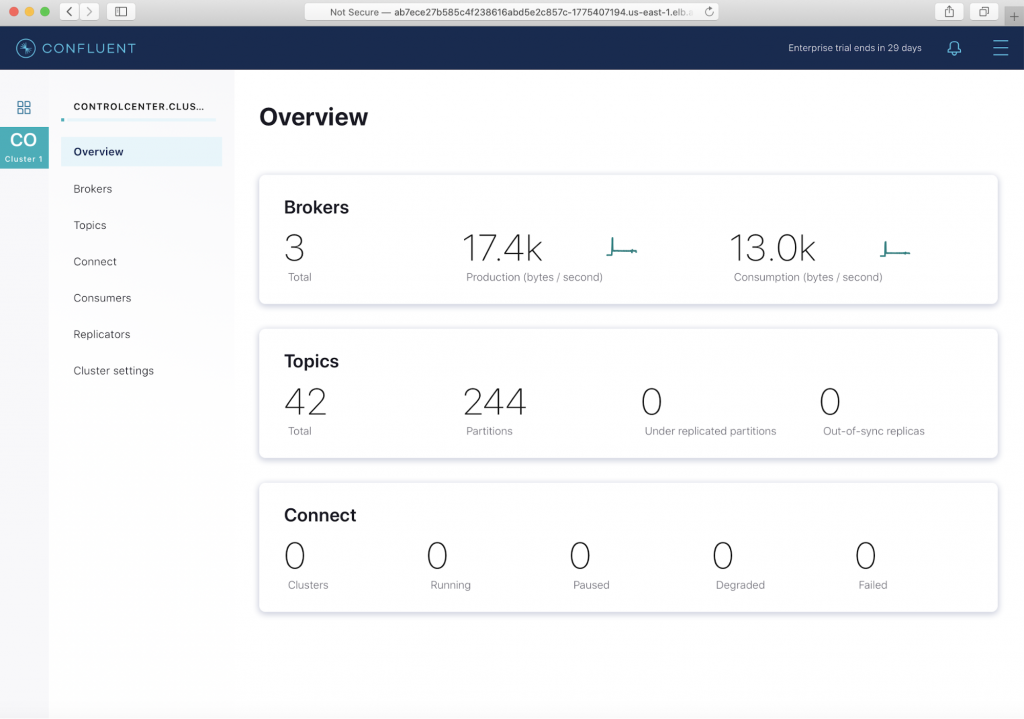
Client access for Kafka brokers
Running helm status kafka-oc-demo gives you the details needed for external and internal client access. The client JaaS config can be directed into a file, say, kafka.properties:
kubectl -n operator get kafka kafka-oc-demo -ojsonpath='{.status.internalClient}' > kafka.properties
Log in to any broker pod:
oc exec -ti kafka-oc-demo-0 bash
Copy the contents of the file kafka.properties onto the broker pod.
Create a topic. Topics can also be created via the Control Center UI.
kafka-topics --create --topic demo_topic --command-config kafka.properties --partitions 6 --replication-factor 3 --bootstrap-server kafka-oc-demo:9071
[2020-07-28 23:40:29,778] WARN The configuration 'sasl.jaas.config' was supplied but isn't a known config. (org.apache.kafka.clients.admin.AdminClientConfig)
WARNING: Due to limitations in metric names, topics with a period ('.') or underscore ('_') could collide. To avoid issues it is best to use either, but not both.
Created topic demo_topic.
Run a simple test to see if you can produce into the topic that was created:
1002580000@kafka-oc-demo-0:/opt$ kafka-producer-perf-test --topic demo_topic --producer.config kafka.properties --record-size  4096 --throughput -1 --num-records 10000
10000 records sent, 2502.502503 records/sec (9.78 MB/sec), 1305.48 ms avg latency, 2029.00 ms max latency, 1380 ms 50th, 1837 ms 95th, 1977 ms 99th, 2025 ms 99.9th.
No test is complete if those messages are not consumed:
kafka-consumer-perf-test --topic demo_topic --broker-list kafka-oc-demo:9071 --messages 10000 --consumer.config kafka.properties
start.time, end.time, data.consumed.in.MB, MB.sec, data.consumed.in.nMsg, nMsg.sec, rebalance.time.ms, fetch.time.ms, fetch.MB.sec, fetch.nMsg.sec
2020-07-28 23:51:23:932, 2020-07-28 23:51:25:648, 39.0625, 22.7637, 10000, 5827.5058, 1595980284862, -1595980283146, -0.0000, -0.0000
Upgrading a component
If you need to upgrade or scale up a component, change the YAML file to suit your needs and fire the command below:
helm upgrade -f values.yaml controlcenter --namespace operator --set controlcenter.enabled=true ./confluent-operator
Cleanup
Clean up all the assets that were created in the project “operator,” including Operator, ZooKeeper, Kafka brokers, and Control Center:
oc delete project operator
project.project.openshift.io "operator" deleted
Finally, destroy the OCP cluster:
./openshift-install destroy cluster --dir=oc-aws-demo/
Conclusion
With so many choices for deploying Kubernetes clusters in the cloud, going with a fully managed Kubernetes service provides greater ease of use and less maintenance overhead without sacrificing flexibility. With OpenShift Container Platform, you can control how a Kafka cluster is deployed, how it’s going to be used, and what level of integration needs to be done with cloud-native services.
The OpenShift Container Platform really shines if the Kubernetes cluster is deployed on prem or in the case where managed Kubernetes services cannot be used, perhaps for compliance reasons. Deploying Kafka on an already-complex Kubernetes cluster should not be “one more thing to worry about.”
Confluent Operator makes Kafka deployment cloud portable and offers a native integration with Prometheus and Grafana for storing and visualizing metrics. With a StatefulSet deployment of Kafka brokers, ZooKeeper ensembles, Schema Registry, and the Connect framework, the business logic of each component is ingrained into the Kubernetes API, resulting in clusters that are self-healing in the event of any failures—which is truly a game-changer for the cloud-native deployment of Confluent Platform everywhere.
Interested in more?
If you’d like to know more, you can download the Confluent Operator to get started with the leading distribution of Apache Kafka.
¿Te ha gustado esta publicación? Compártela ahora
Suscríbete al blog de Confluent
Empowering Customers: The Role of Confluent’s Trust Center
Learn how the Confluent Trust Center helps security and compliance teams accelerate due diligence, simplify audits, and gain confidence through transparency.
Unified Stream Manager: Manage and Monitor Apache Kafka® Across Environments
Unified Stream Manager is now GA! Bridge the gap between Confluent Platform and Confluent Cloud with a single pane of glass for hybrid data governance, end-to-end lineage, and observability.

