Ahorra un 25 % (o incluso más) en tus costes de Kafka | Acepta el reto del ahorro con Kafka de Confluent
Advanced Testing Techniques for Spring for Apache Kafka
Asynchronous boundaries.
Frameworks.
Configuring frameworks.
Apache Kafka®.
All of these share one thing in common: complexity in testing. Now imagine them combined—it gets much harder.
This is the final blog post in a three-part series that describes techniques for shortening the test feedback cycle with infrastructure on demand in your integration tests and using Spring Kafka in a “vertically” scaled way to showcase this process.
If you’d like to check out part 1 and part 2 before reading on, feel free to refer to the following:
- How to Choose Between Strict and Dynamic Schemas
- Self-Describing Events and How They Reduce Code in Your Processors
Why do we need to test? Aren’t we in production?
Almost every engineer has heard the above phrase at least once in their career (or has felt it through the ambient glow of the untested codebase). This post does not delve into all of the reasons why testing is needed, since most are familiar with the concept of the testing pyramid and its utility. However, the following analogy summarizes the key point and should resonate with engineers.
Every codebase is a boxer
When boxers first start off, they train a lot. Before ever stepping into the ring, they practice their jabs, hooks, and uppercuts. They run for miles on end to boost their cardio, and they combine their cardio with technical striking skills in mock setups. They also take on sparring matches at reduced intensity, making sure not to injure themselves or the opponent.
Imagine now that you want to be a boxer too, except you don’t practice your jabs, hooks, and uppercuts, nor run or spar. You claim, “I’ve seen all the ’Rocky’ films and watched a lot of boxing matches on YouTube. I know what to do, so how hard can it be?”
Then, you step into the ring with Floyd Mayweather only to be immediately knocked down and defeated.
Just as boxers must follow the principles of the testing pyramid in order to be successful, codebases should too. Unit tests are essentially jabs, hooks, and uppercuts. Integration tests are like sparring. Performance tests are the cardio, and acceptance tests resemble the coach asking if you’re ready to get into the ring.
You must treat your codebases as if they were boxers. To play off a well-known quote by former world heavyweight boxing champion Mike Tyson, “Everybody has a plan until they deploy to production.”
Testing Spring Kafka and transient errors
The following testing scenario builds off the generic processor that was built in the previous post, which converted Protobuf events to JSON to send to a reporting system. Oftentimes in an environment, the downstream APIs you call may be temporarily unavailable (e.g., network overwhelmed) and usually results in some class of a 500 HTTP error, like a 503 Service Unavailable.
How do you go about configuring Spring Kafka to handle these transient errors and retry sending events to your reporting system? This is where the concept of a container error handler that the framework provides comes into play.
In the generic processor example, the record mode is used for the KafkaListener, which provides one Kafka record at a time to your method. The error handlers separate based on if your listener is configured in record or batch mode (batch mode sends a collection of records at once to the method).
The following are the main types of error handlers that Spring for Kafka supports out of the box:
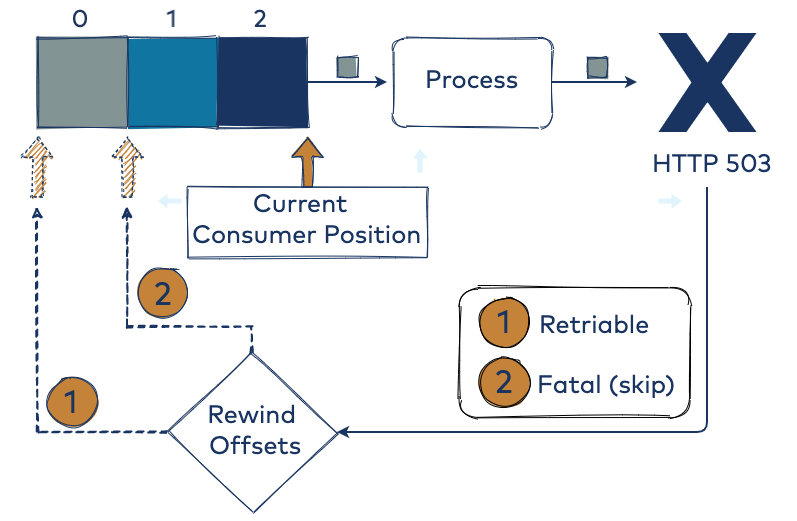
- Offset rewinding: SeekToCurrentErrorHandler and SeekToCurrentBatchErrorHandler rewind the offsets to replay the failed record(s) through your KafkaListener (i.e., it performs Kafka consumer seeks). This supports a number of retry attempts and time between retries. Also, you can configure the recovery function when retries are exhausted (log, dead letter queue, etc.).
- Logging: LoggingErrorHandler and its batch mode equivalent, simply logs into the console and is primarily for development usage.
- Halting: ContainerStoppingErrorHandler and its batch equivalent stops the Spring for Kafka container that manages the underlying Kafka consumer(s). This is usually used if the engineer wants to halt the entire processing pipeline, which is much more aggressive than sending the messages to a dead letter queue (DLQ) for later investigation/re-processing. This is useful when your records must be processed in a specific order to attain the results you need (think event sourcing).
- Transaction rollback: DefaultAfterRollbackProcessor (not an error handler, but similar in nature) is used when transactions are enabled, where your application is performing a consume-process-produce loop from one Kafka topic to another. This guarantees exactly-once processing. This should not be used in any context other than Kafka-to-Kafka pipelines. For example, it is not applicable to Kafka-to-HTTP pipelines.
To learn about how to handle deserialization issues that are not covered above, read this post on Spring for Apache Kafka—beyond the basics.
Based on the above outline for some of the error handlers, the SeekToCurrentErrorHandler is the best to select for the KafkaListener in record mode. Notice that you can configure a BackOff and expose it via configuration. To browse the code that will be shown for the rest of the article, see this repo.
public class KafkaConfig {
  ....
@Min(0)
private long maxRetries = FixedBackOff.UNLIMITED_ATTEMPTS;
@Min(0)
private long retryIntervalMillis = 1000L;
@Bean
public SeekToCurrentErrorHandler seekToCurrentErrorHandler() {
return new SeekToCurrentErrorHandler(new FixedBackOff(retryIntervalMillis, maxRetries));
}
}
The above code specifies that you want to retry any non-fatal errors that get thrown by the KafkaListener an unlimited number of times, each with a one-second backoff between retries. By default, the error handler deems a list of exceptions to be fatal and will skip the records that cause them (e.g., ClassCastException).
You could write your own custom BackOff implementation for more advanced backoffs, which may include jitter to avoid connection storms in tight retry loops. Another possible use case could include evaluating downstream API responses that issue an HTTP 429, which backs off by the amount the downstream system requests in a response header.
Now that you have configured this into your code and have diligently read the documentation, does it actually work? As the boxing analogy that we discussed earlier reveals, you need to actually confirm what you know is what actually happens before you deploy to production. For all you know, right now, you have typed some magic words onto a screen and are taking what the documentation says at face value.
Enter “fast” integration testing
To determine if it works, you need to write an integration test for the transient error scenario. Usually, this involves setting up an environment with the actual components that you need, which in some organizations can take weeks or even months. Unfortunately, it can become extremely difficult to get real systems to behave in their most exceptional state. By shifting-left, as it is commonly termed, you can shift the ability to run this sort of test right out of your own IDE and codebase, with full access to create the exceptional state and interweave them with real components.
To do this, you can utilize a popular library called Testcontainers, along with the standard JUnit 5 testing framework.
Testcontainers provides the ability to run any Docker container right from your tests—any version you want. It even allows Docker Compose file definitions to set up more complex system setups with databases, microservices, and message queues. No more waiting to spin up test infrastructure when you can do it yourself in a quick and reusable way.
The only downside to using Testcontainers is the requirement to install Docker on the system that your tests will be executing on. Tests can execute on developer machines to your Jenkins cluster, imposing this requirement across the CI/CD stack. As a result, there needs to be some upfront calibration to ensure proper Docker installation and cleanup protocols for tests that could become costly. By opening this up, you can potentially instantiate your whole company’s infrastructure in your tests, leading to issues within your CI/CD pipelines. A careful review of how this fits your company’s culture and usage patterns is essential.
The transient test – Assumptions
This test needs to verify three things:
- Is the interpretation of how to set up the SeekToCurrentErrorHandler correct via bean injection?
- Does it behave as advertised with our configuration using backoffs and infinite retries?
- Do our messages get processed after the transient errors stop?
The illustration of the moment in time where you process one record (see gray below) and receive an HTTP 503 is shown in the following image to help you visualize what you think you have configured.

The transient test – In JUnit 5
You can establish the test case by first setting up a testing Kafka cluster via Testcontainers. This maximizes the realism of the test, uses the actual functionality that Spring for Kafka has embedded deep in the library and provides more value, as well as lowers risk.
@SpringBootTest
@Testcontainers
@Slf4j
@ActiveProfiles("test")
public class TransientErrorTest {
  public static final int NUM_PARTITIONS = 3;
  public static final String TOPIC = "prod.readings";
  @Container public static KafkaContainer kafka = new KafkaContainerSBAware();

  @Configuration
  @Import({GenericProtoApplication.class, MockRegistryBeans.class})
  public static class Beans {
    @Bean
    NewTopic testTopic() {
      return new NewTopic(TOPIC, NUM_PARTITIONS, (short) 1);
    }
….
  }
The above test brings up the entire Spring Application Context and runs the application as if it were really executing. The @Testcontainers annotation manages the lifecycle of the KafkaContainer. You can create a test topic utilizing Spring for Kafka’s Admin API feature set, which scans for NewTopic beans in your application context on startup. This allows you to finely control the partitions and replication factor needed for your test.
Next, write a test case exercising the transient case:
  @Test
  void sendDummyEvents_Expect3TransientErrors_ProcessEventSuccess() {
    waitForAssignment();

    // setup stubs
    final int NUM_ERRORS = 3;
    final var NUM_MSGS = 3;
    final CountDownLatch successLatch =
        makeSenderThrowException(
            NUM_ERRORS,
            mockedSender,
            NUM_MSGS,
            new RuntimeException("HTTP 503 SERVICE_UNAVAILABLE"));

    IntStream.range(0, NUM_MSGS).forEach(this::sendSomeDummyEvent);

    assertTrue(isLatchDone(NUM_ERRORS, successLatch));
  }
This test case:
- Awaits the assignment of the test topic’s partitions to the consumer so that no race conditions occur between the test producer and the application’s consumer.
- Creates a transient mock response that throws exceptions based on however many errors you wish to occur. This returns a CountDownLatch, which has its count (number of signals) set to the number of messages you should eventually process.
- Sends NUM_MSGS to your test topic.
- Blocks the test thread on the latch until the wait time has expired (i.e., failure) or the count has reached zero, indicating that the messages eventually got through your transient exception scenario by signaling the latch.
If you are unfamiliar with Mockito, it is recommended that you read up on it before proceeding.
The method that is of most interest in terms of how it is implemented is the makeSenderThrowException() method. This contains all the magic of the transient behavior that we wish to simulate.
private CountDownLatch makeSenderThrowException(
      int numThrowsPerThread,
      ReportingWarehouseSender mockSender,
      int expectedNumberOfMessages,
      Exception exceptionToThrow) {
    var successMsgLatch = new CountDownLatch(expectedNumberOfMessages);
    doAnswer(
            new Answer() {
              ThreadLocal throwCount = ThreadLocal.withInitial(() -> 0);

              @Override
              public Void answer(InvocationOnMock invocationOnMock) throws Exception {
                throwCount.set(throwCount.get() + 1);
                if (throwCount.get() <= numThrowsPerThread) {
                  throw exceptionToThrow;
                } else {
                  log.info(
                      "Success in sending to warehouse: [{}]",
                      invocationOnMock.getArgument(0).toString());
                  successMsgLatch.countDown();
                  return null;
                }
              }
            })
        .when(mockSender)
        .sendToWarehouse(any());

    return successMsgLatch;
  }
The makeSenderThrowException() method sets up the following CountDownLatch with the expected number of messages that should be processed successfully after the error handler does its operation (whether it skips records or retries).
The Answer construct is from Mockito. It sets up a mocked “answer” when one of the mocked object’s methods is called. You can see the creation of a mockSender for the class that forwards the transformed events to the reporting system via sendToWarehouse(), which is stubbed.
The answer contains a ThreadLocal, which has a counter initially set to zero per thread (more on this later). You can then proceed to throw the exception supplied if you have not exhausted the configured throw count. Once you have exceeded the throw count, return the “normal” response, which in this case is nothing because sendToWarehouse() is a void method. Every time you successfully send a message, you signal the latch, which allows the assertions to complete successfully when all messages have gotten through.
The test case is run below and displays some of the output (other log lines omitted for brevity):
2020-09-27 23:00:11.108 ERROR 25588 --- [ntainer#0-0-C-1] essageListenerContainer$ListenerConsumer : Error handler threw an exception
Caused by: java.lang.RuntimeException: HTTP 503 SERVICE_UNAVAILABLE

2020-09-27 23:00:12.112 ERROR 25588 --- [ntainer#0-0-C-1] essageListenerContainer$ListenerConsumer : Error handler threw an exception
Caused by: java.lang.RuntimeException: HTTP 503 SERVICE_UNAVAILABLE

2020-09-27 23:00:13.115 ERROR 25588 --- [ntainer#0-0-C-1] essageListenerContainer$ListenerConsumer : Error handler threw an exception
Caused by: java.lang.RuntimeException: HTTP 503 SERVICE_UNAVAILABLE

2020-09-27 23:00:13.117  INFO 25588 --- [ntainer#0-0-C-1] c.zenin.genericproto.TransientErrorTest  : Success in sending to warehouse
2020-09-27 23:00:13.118  INFO 25588 --- [ntainer#0-0-C-1] c.zenin.genericproto.TransientErrorTest  : Success in sending to warehouse
2020-09-27 23:00:13.124  INFO 25588 --- [ntainer#0-0-C-1] c.zenin.genericproto.TransientErrorTest  : Success in sending to warehouse
Great! The configuration within the application did what was desired. It keeps on retrying until the transient condition subsides and does so every second as seen by the timestamps of when the exceptions are printed at (all one second apart as configured by default).
You might still be thinking, however, why the usage of ThreadLocal? Isn’t only one thread processing if only one consumer is managed by the Spring for Kafka library?
Vertically scale your Kafka consumers
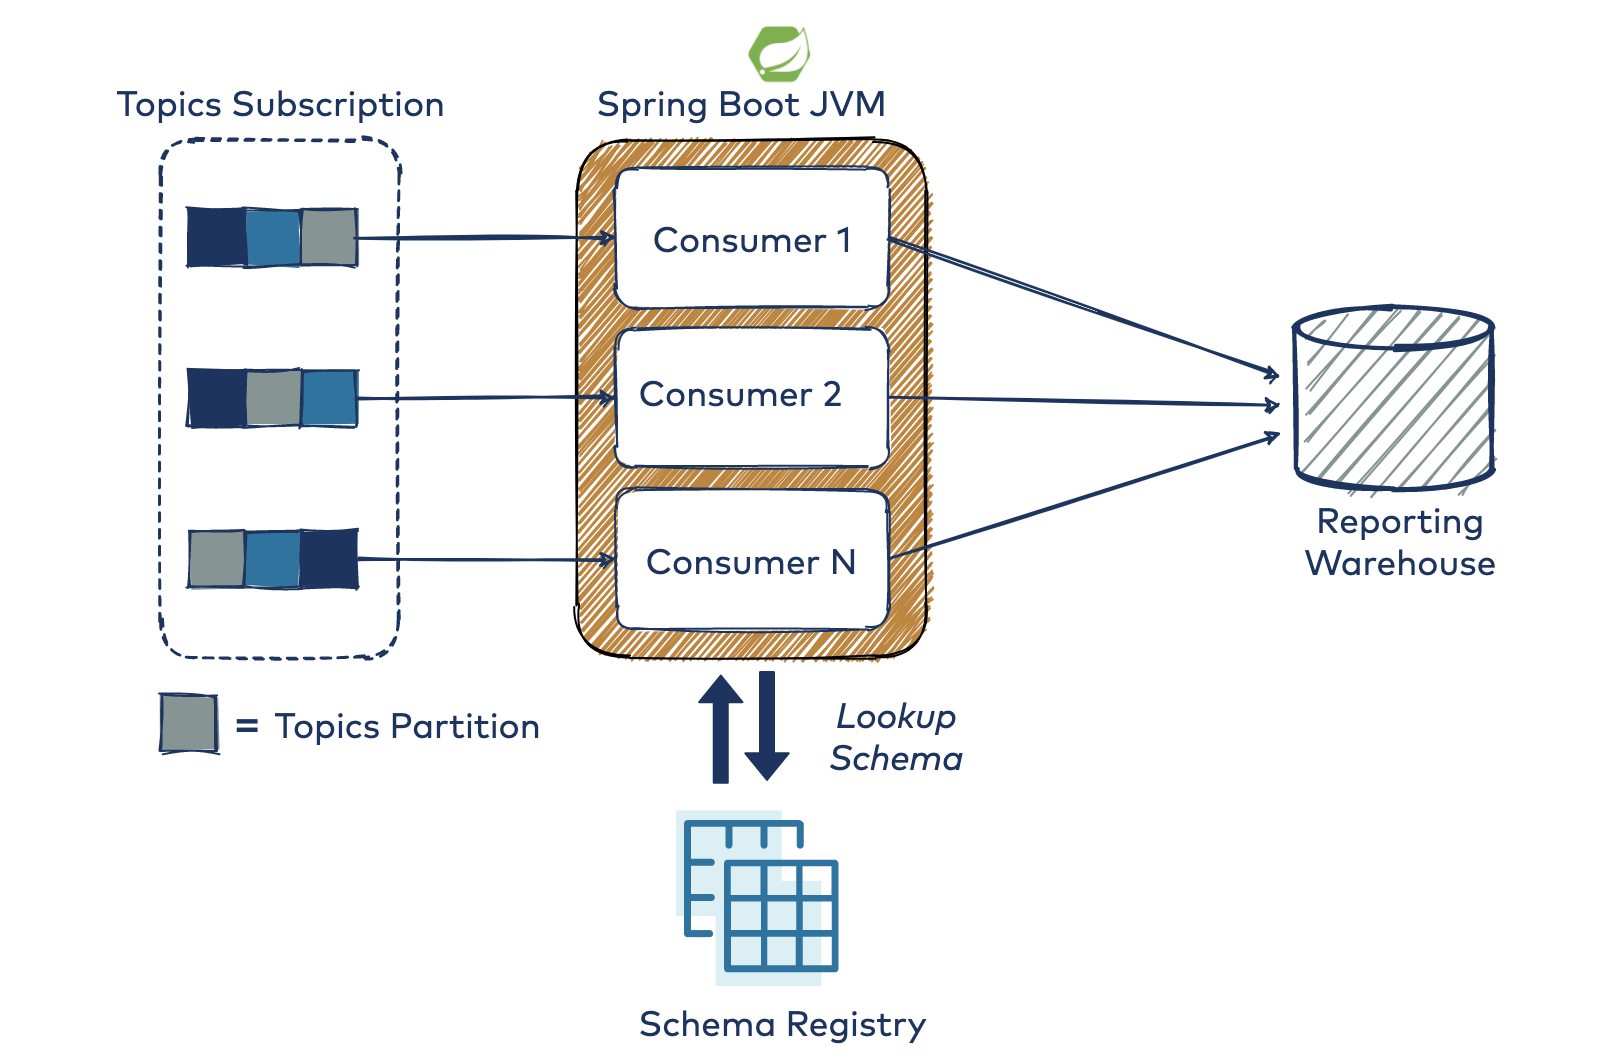
A more advanced configuration of the Spring for Kafka library sets the concurrency setting to more than 1. This makes the library instantiate N consumers (N threads), which all call the same KafkaListener that you define, effectively making your processing code multi-threaded. All of this runs within one JVM instance, scaling the application “vertically,” without adding a new JVM per Kafka consumer. No extra logic is needed to divide the partitions amongst your consumers (processors) as this is taken care of by the Kafka consumer client API out of the box.
spring:
  kafka:
    listener:
      concurrency: 3

By experimenting with these parameters, you can come up with a cost-efficient way to scale your Kafka processor deployments by balancing how many Kafka consumers to run per JVM and how many compute instances you need to host them (virtual/physical).
The added danger to this approach is that now your resulting KafkaListener needs to be thread safe, which is hard to test completely. Infrequent code paths and dynamic configurations can make subtle bugs appear in ways that you had not deemed possible. This adds risk to your deployments and can be difficult to replicate or track down.
Since the KafkaListener can be invoked in a concurrent fashion, during your test, you need to use ThreadLocal to give each thread an independent copy of the counter. This avoids any sort of locks or shared state between threads for your test and makes each processing thread retry three times. You can view the repo where the test is rerun with concurrency set to 3, which results in nine stack traces (three per thread) before getting each thread to report it has successfully processed one message.
Conclusion
From exploring the trade-offs of event design, to creating a generic processor to transform Protobuf events to JSON, this series concludes with how to test and deploy your code.
Through utilizing pre-built components in the Spring for Kafka library, instantiating infrastructure as code within the tests, and exercising transient scenarios in multi-threaded environments, we can see that there is a clear need to shift left. With these tools now in your arsenal, you can get faster, more accurate feedback on how you think your code works compared to how it actually behaves, and reproduce it every time in your testing pipelines.
In the words of John Ruskin, “Quality is never an accident; it is always the result of intelligent effort.”
Get started with event streaming
If you’d like to know more, you can sign up for Confluent Cloud and get started with a fully managed event streaming platform powered by Apache Kafka. Use the promo code SPRING200 to get an additional $200 of free Confluent Cloud usage!
Other articles in this series
¿Te ha gustado esta publicación? Compártela ahora
Suscríbete al blog de Confluent
How a Tier‑1 Bank Tuned Apache Kafka® for Ultra‑Low‑Latency Trading
A global investment bank and Confluent used Apache Kafka to deliver sub-5ms p99 end-to-end latency with strict durability. Through disciplined architecture, monitoring, and tuning, they scaled from 100k to 1.6M msgs/s (<5KB), preserving order and transparent tail latency.
How to Build a Custom Kafka Connector – A Comprehensive Guide
Learn how to build a custom Kafka connector, which is an essential skill for anyone working with Apache Kafka® in real-time data streaming environments with a wide variety of data sources and sinks.

